
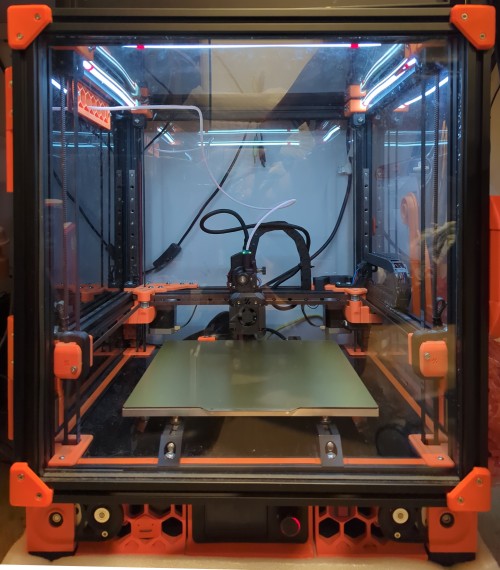
Stats
Serial: Voron V2.4809
Cereal: Reeses Puffs
Controller: Pi Zero 2 W
Firmware: Klipper Mainsail
MCU: BTT Octopus Pro
Build Volume: 250x250x250mm
Klipper Plugins
Misc Hardware Mods
Clicky-Clack Fridge Door
Rotated Back Panel
Slot covers
LCD backlight bleed tape
Aitonina
I’m trying to troubleshoot mysterious shutdowns
Future Upgrades
256×256 Build Plate1
300x300x300 Upsize2
Bed alignment pins
Belt tension test
Door switch for lights
Fix cracked pieces (there are many)
LED Progress Bar
BIGTREETECH KNOMI
Name plate
Nevermore Filter
Physical Pause Print Button
USB Port (print from USB)
GT1.5 belt swap
IDEX (Flydex?)
Dragon Burner Toolhead
0.4mm Bambu X1C Hotend
Orbiter V2.0 Extruder
Orbiter Smart Sensor
Orbitool O2 Toolboard
ZeroClick Probe (bed dock by me)
Tighter X Carriage (by me)
X Endstop Hitter (by me)
Rejected Mods
Quick release panels (too fiddly; how often do people actually take them off?)
Mods Designed by Me
Bambu A1 Nozzle Wiper
LED Light Strips
Orbitool USB Double DIN Mount
Piezo Buzzer
Removed RJ45 Jack
Rigid LCD Skirt
Side Power Switch
TF Card Skirt Badge
Some of my designs are on Printables
(I’ll clean it up later)
Modifications in Depth
Dragon Burner Tool Head
My printer doesn’t print too good. I suspect it has something to do with the ungodly number of times I’ve sent it crashing into the print bed, but I can’t be too sure. The Afterburner my printer was original built with is made up of a combination of printed and injection molded parts which came with my Voron kit.
[Under construction…]
Black & Orange
The 3D printed parts of my printer are in eSun ABS+ (or was it normal ABS?) orange and black. I really love the aesthetic of Prusa printers and wanted to recreate it.
Smart Homing
Patience is a virtue, but a virtue I don’t have (when it comes to 3D printing). If my printer doesn’t need to home XYZ, it shouldn’t. If my printer doesn’t need to quad gantry level3, it shouldn’t (it’s agonizing to watch).
This is what I love about Klipper, if I don’t like how something works, I can just change it.
[gcode_macro SMART_G28]
gcode:
    {% if "xyz" not in printer.toolhead.homed_axes %}
        G28
    {% else %}
        RESPOND TYPE=command MSG='Already homed!'
    {% endif %}

[gcode_macro SMART_QUAD_GANTRY_LEVEL]
gcode:
    {% if printer.quad_gantry_level.applied == False %}
        QUAD_GANTRY_LEVEL
    {% else %}
        RESPOND TYPE=command MSG='Already quad gantry leveled!'
{% endif %}Out of Paper
Z offset is the distance between the nozzle and bed when the probe triggers. It doesn’t matter whether you have a bed probe or not, everyone has to calibrate their Z offsets at least once (usually with a piece of paper). But what if it was exactly once, instead of every nozzle or build plate swap?
Automatic Z-Calibration is a Klipper plugin that combines measurements from the official spec Z endstop and a bed probe to calculate Z offsets.
To install, run the installation script, then create a config file to configure the plugin. Note that the installation script updates the Moonraker Update Manager (older tutorials ask you to do it manually). Also note that I’m using a mechanical switch probe.
[include z_calibration.cfg]

[bed_mesh]
speed: 120
horizontal_move_z: 15
mesh_min: 50, 50
mesh_max: 200, 200
zero_reference_position: 125, 125
probe_count: 6, 6
adaptive_margin: 5

[gcode_macro G32]
gcode:
    # Home axes, etc. #
    ATTACH_PROBE
    SMART_QUAD_GANTRY_LEVEL
    {% if printer.z_calibration.last_query != True %}
        CALIBRATE_Z
    {% endif %}
    BED_MESH_CALIBRATE ADAPTIVE=1
    DETACH_PROBE
# Park print head, etc. #The CALIBRATE_Z command is only called in G32 if not already calibrated. SMART_QUAD_GANTRY_LEVEL is explained here.
I’ll be comparing my config file to the minimal startup configuration included in the instructions. nozzle_xy_position is omitted because [safe_z_home] is included in the official V.2 initial startup. switch_xy_position is used instead of switch_xy_offsets because it’s easier to measure; just attach the probe and jog it over the z endstop so that the flat part of the switch can push it without interfering with the bed. bed_xy_position is omitted; ensure zero_reference_position is configured in [bed_mesh]. switch_offset is dependent on the type of microswitch used; the D2F-5 microswitch I have in my probe has a pretravel of 0.5mm, hence the value used. The start_gcode temporarily sets the gcode offset to 0 to ensure docking isn’t affected by the auto-calibration process; this is only relevant for probes that dock to the bed like mine. end_gcode is not used as I do not want to dock the probe (before BED_MESH_CALIBRATE is called in G32).
[z_calibration]
switch_xy_position: 203,238
switch_offset:      0.4
# Smaller offset value, nozzle further away from the bed #
start_gcode:
    RESPOND TYPE=command MSG='Z-calibration start...'
    SAVE_GCODE_STATE NAME=ATTACH_PROBE
    SET_GCODE_OFFSET Z=0.0
    ATTACH_PROBE
    RESTORE_GCODE_STATE NAME=ATTACH_PROBE
end_gcode:
    RESPOND TYPE=command MSG='Z-calibration complete!'
M300 S2000 P100Alright KAMPers
Every 3D printer should use adaptive bed meshing. I have no clue why Bambu and Prusa printers still waste time probing their entire bed instead of only the actual print area. It drives me mad watching a printed take 25 measurements when they really only need 9 (for most of the smaller prints I need). Klipper Adaptive Meshing & Purging (KAMP) does just that and more.
The adaptive bed meshing of KAMP has been integrated into mainline Klipper, but not the adaptive purging (at time of writing, Nov 2025). Adaptive purge uses a very short line (or Voron logo) right next to the print instead of always in the same spot. It uses very little material and eliminates the need for skirts or bigger purges and it minimizes the stringing you’d get from purging along the side of the print bed and stretching a filament strand all the way over to the start of a print.
That’s why I have the KAMP plugin installed.
[include KAMP_Settings.cfg]

[gcode_macro G32]
gcode:
    # Home axes, etc. #
    BED_MESH_CALIBRATE ADAPTIVE=1 # Built-in adaptive bed mesh
    # Park print head, etc. #

[gcode_macro PRINT_START]
gcode:
    # Set temperature #
    G32
    # Wait to reach temperature, etc. #
LINE_PURGE # KAMP purge# Start of config #
[include ./KAMP/Line_Purge.cfg] # Uncomment this line
# Rest of config #Red, Green & Blue
Personally, RGB on toolheads or chamber lighting feels a bit tacky. I mean if you want to go for that gaming computer look for your printer, then go for it, but I prefer to give my machine a more utilitarian look. But the official Voron spec BTT Mini12864 screen comes with 3 RGB LEDs built in and I wanted to get the most out of them.
LED index 1 and 2 shine through the control knob, while index 3 is a backlight for the LCD screen. While I was trying to configure them and after a bit of confusion, I figured out that knob LED (index 1) bleeds light into the screen. I recommend fellow owners to put a bit of black electrical tape between the side of the screen and the knob like I did. Besides that, I found that setting the 2 knob LEDs to different colors wasn’t very readable so I made the LED macros treat them as one.
I configured the screen and knob colors to indicate the current state of the machine. Note that, given the same RGB values, the knob and screen colors can appear different.
| Color | RGB | Screen Meaning | Knob Meaning |
|---|---|---|---|
| Green | R=0 G=1 B=0 | Ready to print | Ready to print |
| Orange | R=1 G=1 B=0 | Printing Unloading filament | Printing |
| Blue | R=0 G=1 B=1 | Homing | XYZ Homing |
| Red | R=1 G=0 B=0 | Paused Quad gantry level | Bed mesh calibration Paused Quad gantry level Unloading filament |
| Red (faint) | R=0.1 G=0 B=0 | – | Printer idle |
| Off | R=0 G=0 B=0 | Printer idle | – |
Klipper interfaces with the RGB LEDs as a chain of 3 NeoPixels.
[neopixel btt_mini12864]
pin: EXP1_6
chain_count: 3
initial_RED: 0.0
initial_GREEN: 0.0
initial_BLUE: 0.0
color_order: RGB

[gcode_macro SET_LED_KNOB]
gcode:
    {% set R = params.R|default(0)|int %}
    {% set G = params.G|default(1)|int %} # Default green
    {% set B = params.B|default(0)|int %}
    SET_LED LED=btt_mini12864 RED={R} GREEN={G} BLUE={B} INDEX=1 TRANSMIT=0  # TRANSMIT=0 suppresses loading new color
    SET_LED LED=btt_mini12864 RED={R} GREEN={G} BLUE={B} INDEX=2 TRANSMIT=1

[gcode_macro SET_LED_SCREEN]
gcode:
    {% set R = params.R|default(0)|int %}
    {% set G = params.G|default(1)|int %} # Default green
    {% set B = params.B|default(0)|int %}
    SET_LED LED=btt_mini12864 RED={R} GREEN={G} BLUE={B} INDEX=3 TRANSMIT=1

[gcode_macro LED_OFF]  # Faint red light when idle
gcode:
    SET_LED LED=btt_mini12864 RED=0 GREEN=0 BLUE=0 INDEX=1 TRANSMIT=0
    SET_LED LED=btt_mini12864 RED=0.1 GREEN=0 BLUE=0 INDEX=2 TRANSMIT=0
SET_LED LED=btt_mini12864 RED=0 GREEN=0 BLUE=0 INDEX=3 TRANSMIT=1Buzz Off
The BTT Octopus Pro has a buzzer built in but I haven’t found a way to interface with it in Klipper. I had a few piezo buzzers lying around and an empty fan header on the control board, so I added a buzzer to my printer.
My buzzer is connected to the 2-pin header, along the bottom of the board, 3rd from the right if the USB C socket is positioned on the right. The pinout diagram for the BTT Octopus Pro is a bit unintuitive to read (and low resolution) but this corresponds to component J55, labelled FAN5 with controller pin name PD15. The controller pin name (PD15, in this case) is what Klipper uses in its config files.
I configured the buzzer to audibly let me know the state of the machine and it’s been a huge quality of life feature.
| Buzzer Pattern | Meaning |
|---|---|
| 1 beep | Filament unload complete |
| 2 beeps | Print started Print resumed |
| 3 beeps | Print cancelled Print completed |
| 1 long beep | Print paused Temperature reached |
The macro is named M300 to match the name used for the play tone command built into Marlin (another popular 3D printing firmware).
[pwm_cycle_time buzzer_pin]
pin: PD15
value: 0
cycle_time: 0.001

[gcode_macro M300]
gcode:
    {% set S = params.S|default(1000)|int %}  # Tone frequency (Hz)
    {% set P = params.P|default(100)|int %}  # Tone duration (ms)
    SET_PIN PIN=buzzer_pin VALUE=0.5 CYCLE_TIME={1.0/S if S > 0 else 1}
    G4 P{P}
SET_PIN PIN=buzzer_pin VALUE=0What’s the Wifi Password?
My dad likes to change the wifi password pretty often (I’m still living with parents at time of writing, Nov 2025). The way to change the wifi password on a Raspberry Pi (without connecting it to a full set of peripherals) is through the TF (microSD) card. My computer tower sits on top of my printer, so I have to pull out all the cables in my computer, put my computer away, pull out my printer, flip it upside down and unscrew the bottom panel to pull out the TF card.
After the first 3 times, I decided to get an extension cable and route it into a skirt badge on the front of my printer. Annoyingly, the skirts have a curve to them so I can’t make a full hexagon shape. The female end of the cable only just fits the skirt holes so designing a mount was a challenge. I’m not completely happy with it but I’ll publish a cleaned up model in the future.
I Spun it Right Round
My printer currently sits under a table, up against a wall. This makes it really annoying to change spools or reach around for the power switch. That’s why the back panel is now on the left and the power switch is on the front right side skirt A. I can reach it with my foot.
Zippy Noisemaker
My nozzle tends to drip at the start of every print which tends to mess with my Z calibration.
I chose to use the Bambu A1 Nozzle Wiper because it’s readily available and seemed the most reliable. Most Voron nozzle wiper mods seem to use brass brushes but with most nozzles also being made of brass, it creates unnecessary wear which eventually ruins their accuracy due to enlarged holes. The Bambu X1C/P1P style nozzle cleaners also exist but I’ve seen a lot of Bambu users complaining about them and upgrading it with A1 style wipers so I wouldn’t trust their reliability. There are existing designs for A1 wiper mounts but I decided to design my own and make it much more compact.
As for the gcode macro, the WIPER_X, WIPER_X2, WIPER_Y and WIPER_Z define the position of the wiper. WIPER_Z_CLEAR is the minimum z height required for the nozzle to clear the brush. I only ensure that the nozzle is above the minimum height instead of always lowering to a set height to prevent crashing my probe if it is attached.
It makes a zipping noise when it wipes.
[gcode_macro WIPE_NOZZLE]
gcode:
      {% set WIPER_X = 231 %}
      {% set WIPER_X2 = 183 %}
      {% set WIPER_Y = 250 %}
      {% set WIPER_Z = 1 %}
      {% set WIPER_Z_CLEAR = 6 %}

      RESPOND TYPE=command MSG='Wiping Nozzle'
      SAVE_GCODE_STATE NAME=wipe_nozzle_state
      G90
      {% set th = printer.toolhead %}
      {% set z_safe = (th.position.z if th.position.z > WIPER_Z_CLEAR else WIPER_Z_CLEAR) %}
      G0 Z{z_safe} F4000
      G0 X{WIPER_X} Y{WIPER_Y} F20000
      G0 Z{WIPER_Z}  F4000
      G0 X{WIPER_X2}
RESTORE_GCODE_STATE NAME=wipe_nozzle_stateIn Stability
Every start print gcode should call M109 to wait for the bed and hotend to reach their target temperatures. The problem is that it keeps waiting until the temperature becomes stable, which sometimes takes an unreasonable amount of time (even with a PID tune). After a bit of hunting, I came across Ellis’ Print Tuning Guide and their M109 replacement. Now the printer starts as soon as it reaches temperature instead of oscillating the hotend temperature for 5 minutes.
[gcode_macro M109]
rename_existing: M99109
gcode:
    {% set s = params.S|float %}
    M104 {% for p in params %}{'%s%s' % (p, params[p])}{% endfor %}  # Set hotend temp
    {% if s != 0 %}
        TEMPERATURE_WAIT SENSOR=extruder MINIMUM={s} MAXIMUM={s+1}   # Wait for hotend temp (within 1 degree)
{% endif %}No Clicks?
While the official Voron spec (as well as the Afterburner toolhead) calls for an inductive probe, the Klicky probe has quickly become one of the most popular mods for the V2.
Inductive probes measure the magnetic field of a print bed to determine distance from the bed. I’ve had a lot of problems where the probe overestimated the distance to the bed: I’ve crashed my toolhead into the bed multiple times, scratched shapes into both sides of my PEI coated build plate and one time, I accidentally forgot to put the build plate back on so the printer plunged a hot nozzle directly into the magnetic layer underneath. I used a knife to carve the crater flat again, but there’ll forever (I probably won’t replace it because it’s just cosmetic) be a hole hidden under my build plate now. I do need to get a new build plate to get those patterns off the bottom of my prints though. Right before I decided to replace my Afterburner toolhead entirely, either some cables were fraying, some timing issue, or the sensor was dying because the printer would often stop detecting the probe entirely, preventing me from printing at all.
The Klicky probe is a drop in replacement for the inductive probe that uses a microswitch to mechanically probe the bed instead. It has a lot of advantages over the official spec. It’s cheaper, lighter, robust to thermal variations (magnetic fields are affected by heat), compatible with all print surfaces (inductive probes only work with metal), and more accurate and repeatable. It uses magnets to attach and detach the probe from a dock, using the built in motion of the printer, which is necessary as the switch has to be below the nozzle during probing and out of the way while printing.
The ZeroClick probe is a Klicky inspired probe designed for the V0 and other 3D Printers for Ants. It’s even smaller and cheaper and I chose to use it as it’s officially supported by the Dragon Burner Toolhead (and has the mount built in, despite recommendations against it on the ZeroClick page).
All 3 ZeroClick docks are designed to be used in the V0; as such, they’re all attached to somewhere on the gantry. The rear dock seemed the best option, as it would be positioned well outside the build area; however, it was too short for the V2 , so I searched and found a modified version by ByteWelder. This dock was terrible. The long cantilever design was wobbly and dimensions were too off for my toolhead to reach and dock the probe.
I designed my own ZeroClick dock that mounts to the print bed rails instead of the gantry. The V2 has a flying gantry and there’s no reason to lug around a probe dock to every Z height. Mounting it to the rails also allows adjustments in Y, so toolheads can reach it properly. My current dock is printed in PLA, but my design is robust to warping4.
For the attach and detach macros, I used variables to store the coordinates of the dock to make it easy to recalibrate; to find them, attach the probe to the toolhead then use the Mainsail toolhead controls to jog the toolhead around so that the probe sits in the dock (make sure to slide in from the side, not straight down). Use gradually smaller increments as you approach the dock; I’ve found that 1mm increments is accurate enough because the dock is tapered.
Sometimes, the printer can run into an unexpected error and stop while probing. While my macros can’t handle partial attachments, I’ve crashed the toolhead enough times (again) (because the probe wasn’t detached) to modify my macros to detect whether the probe is already attached before attempting to attach it again. Note that the attach/detach sequences are in separate macros as the value of printer.probe.last_query only updates at the end of a macro call; QUERY_PROBE has to be called separately as seen here (this took way too long to debug).
As for the actual docking sequences, moving the dock along the Y axis in a shearing motion appears to put the least amount of pressure on the magnets. Lowering the toolhead directly onto the probe (during attachment) can cause the magnets to jump out of their holes (if not glued in); approaching from the front is much gentler. The detach sequence moves the toolhead at a slight diagonal to push the probe against the back of the dock; since the dock itself only uses a ferromagnetic screw to hold the probe in, it doesn’t reliably stick without a little pressure.
Worth noting is the line of code that ensures the toolhead is at a minimum height above the dock before attempting to attach and detach. I didn’t think about handling edge cases where the probe would start below the dock, until it kept mysteriously failing.
[gcode_macro ATTACH_PROBE]
variable_dock_x: 87
variable_dock_y: 244
variable_dock_z: 3
gcode:
    QUERY_PROBE
    ATTACH_PROBE_SEQUENCE

[gcode_macro DETACH_PROBE]
gcode:
    QUERY_PROBE
    DETACH_PROBE_SEQUENCE

[gcode_macro ATTACH_PROBE_SEQUENCE]
gcode:
      {% set DOCK_X = printer["gcode_macro ATTACH_PROBE"].dock_x %}
      {% set DOCK_Y = printer["gcode_macro ATTACH_PROBE"].dock_y %}
      {% set DOCK_Z = printer["gcode_macro ATTACH_PROBE"].dock_z %}
      {% if not printer.probe.last_query == 0 %}
          SMART_G28
          SAVE_GCODE_STATE NAME=attach_probe_state
          G90
          {% set th = printer.toolhead %}
          {% set Z_SAFE = (th.position.z if th.position.z > DOCK_Z + 15 else DOCK_Z + 15) %}
          G0 Z{Z_SAFE} F4000
          G0 X{DOCK_X} Y{DOCK_Y - 10} F20000
          G0 Z{DOCK_Z} F4000
          G0 Y{DOCK_Y}
          G0 X{DOCK_X + 30}
          G0 Z{DOCK_Z + 15}
          RESTORE_GCODE_STATE NAME=attach_probe_state
      {% else %}
          RESPOND TYPE=command MSG='Probe already attached! Attach cancelled.'
          M300
      {% endif %}

[gcode_macro DETACH_PROBE_SEQUENCE]
gcode:
      {% set DOCK_X = printer["gcode_macro ATTACH_PROBE"].dock_x %}
      {% set DOCK_Y = printer["gcode_macro ATTACH_PROBE"].dock_y %}
      {% set DOCK_Z = printer["gcode_macro ATTACH_PROBE"].dock_z %}
      {% if printer.probe.last_query == 0 %}
          SMART_G28
          SAVE_GCODE_STATE NAME=detach_probe_state
          G90
          {% set th = printer.toolhead %}
          {% set Z_SAFE = (th.position.z if th.position.z > DOCK_Z + 15 else DOCK_Z + 15) %}
          G0 Z{Z_SAFE} F4000
          G0 X{DOCK_X + 30} Y{DOCK_Y} F20000
          G0 Z{DOCK_Z} F4000
          G0 X{DOCK_X}
          G0 X{DOCK_X - 10} Y{DOCK_Y - 10}
          G0 Z{DOCK_Z + 15}
          RESTORE_GCODE_STATE NAME=detach_probe_state
      {% else %}
          RESPOND TYPE=command MSG='Probe missing! Detach cancelled.'
          M300
{% endif %}Be sure to call ATTACH_PROBE and DETACH_PROBE in whatever macros that need it. I think there’s a way to make your printer attach and detach automatically whenever the probe is used, but I haven’t figured out how to do it reliably. Note that SMART_G28 and SMART_QUAD_GANTRY_LEVEL are explained here. QUAD_GANTRY_LEVEL calls ATTACH_PROBE to ensure the probe is attached before quad gantry leveling, but not DETACH_PROBE because I don’t want to dock-undock between quad gantry leveling and bed meshing (hopefully that sentence makes sense). CALIBRATE_Z is explained here.
[include zeroclick.cfg]

[probe]
pin: orbitoolO2:PA15
deactivate_on_each_sample: False
z_offset: 10
speed: 5.0
samples: 2
sample_retract_dist: 2.0
samples_tolerance: 0.05
samples_tolerance_retries: 3

[gcode_macro QUAD_GANTRY_LEVEL]
rename_existing: QUAD_GANTRY_LEVEL_BASE
gcode:
    ATTACH_PROBE
    QUAD_GANTRY_LEVEL_BASE

[gcode_macro G32]
gcode:
    SAVE_GCODE_STATE NAME=STATE_G32
    G90
    SMART_G28
    ATTACH_PROBE
    SMART_QUAD_GANTRY_LEVEL
    {% if printer.z_calibration.last_query != True %}
        CALIBRATE_Z
    {% endif %}
    BED_MESH_CALIBRATE ADAPTIVE=1
    DETACH_PROBE
    PARK
RESTORE_GCODE_STATE NAME=STATE_G32Shut the Front Door
The stock V2 doors are held together with hopes and dreams. I am genuinely perplexed as to how other people in the community get them to work. They’re flimsy and they don’t seal well. They’re the only part of the official Voron spec that is structurally held together with double sided tape.
When I came across the Clicky-Clack Fridge Door, browsing popular Voron mods (but not on Voron mods), I immediately knew those thin acrylic doors were coming off. I considered self-sourcing the complete build but I calculated it was much more economical to buy a kit from Aliexpress (not to mention I don’t have a clean way of cutting aluminum extrusions yet). Almost all available kits are sized for the 300mm and 350mm variants but I did manage to find a vendor who sold 250mm kits. However, they were unreasonably expensive if the acrylic panels were included, so I ordered the panels separately. One pro tip for self-sourcing acrylic panels on Aliexpress is that sellers are more than happy to cut panels down to whatever dimensions you want at no extra cost. Just message them the dimensions you need, they’ll charge you for the stock material and send you the perfect size panel in the mail.
The door can be satisfyingly slammed shut like a mini fridge now, and I’m really happy. It does look a little odd having an extrusion’s worth of door sticking out the front but the door is infinitely better than the official spec.
When I first installed the door, it shut very well but over time, the latch started getting caught. I thought it was due to the PLA parts (I don’t have an air filter to print ABS yet) warping over time, but I later debugged it as the extrusions coming out of alignment. It uses the same blind joints as the rest of the printer, but I realized that those don’t bend because every corner of the printer is reinforced with 3D printed parts. Adding the panel corner clips to the door fixed all the issues I had with the door.
Another issue I had with the door is the panel mounting strips falling off. I assume it’s because the ones that came with the kit were too thin. I double sided them in, but I think the huge line of micro fractures in the panel is due to me slamming the door and the panel rattling inside. I can’t feel anything rubbing my finger along the edge, so I think it’s just superficial. In any case, it’s not structural / load bearing; I’m sure she’ll be right.
- For compatibility Bambu X1/P1/A1 series build plates. These printers are becoming some of the most popular these days so there’s a lot of new developments for it. Maybe not best for longevity because it is a very esoteric size. ↩︎
- Increasing the frame of the printer while keeping the build plate small, an IDEX printer would be able to use the whole build plate. ↩︎
- Quad gantry leveling is what separates the V2 from almost every other printer. The XY gantry is suspended from each of its 4 corners by independently driven timing belts. The 4 corners of the print bed can be probed to adjust the 4 corners of the gantry to make it parallel to the print bed. ↩︎
- Citation needed ↩︎