
When Will Cogley released a no hardware version of his animatronic Eye Mechanism, I tried to printing it to no success. While my printer is not the most accurate machine, I was disappointed to find that not only did the printed components not fit together but the servos wouldn’t fit into the huge base piece. Another pile of parts straight into the recycle bin. If I wanted to make an eye mechanism, I’d had to design one myself and if I were to design it myself, there were a few changes I wanted to make on top of having wider fit tolerances.
Keeping It Simple, Stupid
| Cogley‘s Design | My Design |
|---|---|
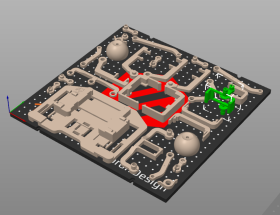 | 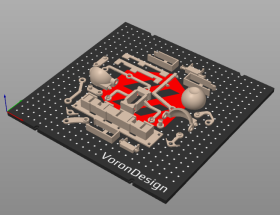 |
If you intend your 3D print to be replicated, it’s essential to give printing instructions. Note the highlighted part in the above screenshot; it clearly has no print orientation that can eliminate supports and others are less obvious. Most people who use existing designs do so because they lack relevant design skills, knowledge or time to design their own. It’s unreasonable to expect them to trial and error different print settings when you’ve already figured them out or even designed with them in mind. Ideally, your design should eliminate the need for supports completely. Maker’s Muse has an excellent video on techniques to eliminate support material that I use in all of my designs. Needless to mention, my eye mechanism prints completely without supports.
As I wanted my design to take up the least amount of space and weight possible, parts became smaller and I ran into issues with low bed adhesion. So I designed in some runners between problem areas to keep everything in place as it printed. This does mean that some parts need a little post processing but it ensures that people will be able to print everything reliably on the first try.
On the pursuit of minimising, I also reduced the number of servo motors required in the mehcanism. While Cogley’s design had a servo for each top and bottom eyelids for each eye, in his video he doesn’t seem to animate the top and bottom ones independently. I designed my mechanism with a single motor for each eyelid pair like in James Bruton’s eye mechanism, making 4 Degrees of Freedom:
- Eye pan (left / right)
- Eye tilt (up / down)
- Left eyelid (open / close)
- Right eyelid (open / close)
Finally, I exported my 3D files in `.step` format as opposed to `.stl`. This is more of nitpick but I’m often frustrated by people who still export their CAD files to triangle-based 3D file formats like `.stl` when vector-based ones like `.step` are more convenient in every way. Not only is it always faster to export to `.step` because there’s less computation involved, you inherently lose detail when exporting as an `.stl` because features such as circles have to be approximated with straight lines. It also annoys me that flat surfaces such as squares have to be chopped up into triangles unnecessarily.
Models available on Printables here.
Leave a Reply